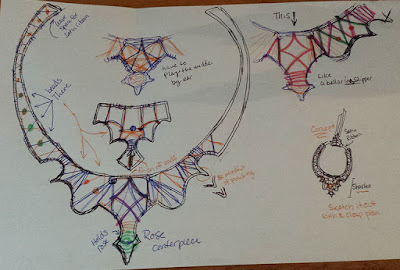
We're back to the drawing board now. I know it's not really what you want to hear, but trust me, this is to help with headaches that can show up later but just 'wingin' your wrap. As you can see with the image above, it took me quite a few tries to sketch out what I thought would look good. I like using different color pens and markers so that each time I sketch out a pattern and mess up, I can always go back over it with another color... sort of. Haha. While I planned out my wrap I also included the position of the beads and where the rose would need to be attached (wire direction and such). I wasn't planning on adding beads until the second layering of the wire happened. As I've been going the necklace design seems to have taken over a life of its own and is now very ballerina-esk. Sometimes these things are planned, and sometimes not. I'm sure there's some sort of crafty saying about shoes fitting, or happy mistakes to be said some where in here, but I'm just going to pretend I said something witty here and move on.

So now that your plans are all laid out, lets cut ourselves a length of wire. Make it long enough that you're comfortable wrapping it and not poking yourself in the eye. You also don't want it really short or you'll have to keep replenishing your wire, which I will go over later. It's just a bit of a pain to do and has the potential of looking glaringly bad.
To start your wrapping, take an end of your length of wire and then pinch it parallel to frame wire. Hold it steady there, and make sure you have a good chunk of the end, but not too much as to be wasteful. For my design I have the longer portion of the wire going away from the end of the frame as that is the direction of the wrap that I am doing. After I do the first wrap, I will switch the direction to go the way the wire feeds towards the middle of the necklace. I did this because otherwise I'd be starting too far away from the end of the frame, so it wouldn't look as good.

So, you're pinching this wire with your off hand. With the other hand you'll want to do a loop around the frame- not the entire frame, just the one wire portion. It doesn't have to be perfect at all, but you will want it to be tight as possible so your next loop will be perfect. The next loop, you want it to be tight, and you want it to be perpendicular to the wire you are looping around. Keep looping until you're satisfied with the amount of wrap. For me and the design I'm doing, I wrapped around 4 times per small wrap. You'll need at least 3 good wraps to do an end like this.
Now that you've done the starting portion of your wrap, you'll want to slide your wire wrap into place. Go to your original wonky first loop. Take your flat nosed pliers and shape that first loop to match your other loops. Pinching the wire as pictured above will align it to the other loops. Pulling the end will tighten the loop to further put it into place. You may need to do this several times until it's just right. Once you have that first loop in place, you'll want to cut off the excess wire. Leave enough to curl the end to a place which wont be on the outside of the frame- where it can snag onto clothing. Once you've done this you'll want to take your pliers and clamp it down, curling it around the frame wire. While clamping you'll also be clamping the other wire loops. This does a sort of crimping action to your loops and will make their placement permanent on the frame's wire. It's important to note that if you have some wire wrapping that slides a bit, use a pair of pliers to sort of 'crimp' the loops into place. Be careful when doing this as too much will strip your wires, way way too much will destroy your loops, and not enough will wind up with a wrap that still slides.
Once you've curled that edge around, you're done with that wrap. Now you continue to the next place to wrap your wire. The next wrap you do shouldn't require you to hold anything other than the frame because your first wrap is doing all that work for you. So now you can just merrily wrap away!


